


ZCU106 Evaluation Kit: Overview, Features,Components, Quick start guide
Introduction
The ZCU106 Evaluation Kit is a development board designed by Xilinx for prototyping and evaluating designs based on their Zynq UltraScale+ MPSoC platform. This guide will provide an overview of the kit, its components, and how to get started with it.
Table of Content
ZCU106 Evaluation Kit Overview
With the ZCU106 Evaluation Kit, designers may quickly prototype solutions for applications such as streaming and encoding, advanced driver assistance systems (ADAS), surveillance, and video conferencing. With the ZynqTM UltraScale+TM MPSoC EV device included in this kit, which supports all main peripherals and interfaces, development for a broad range of applications is made possible. A quad-core Arm® Cortex®-A53 applications processor, a dual-core Cortex-R5 real-time processor, a MaliTM-400 MP2 graphics processing unit, an H.264/H.265 video codec capable of 4KP60, and 16nm FinFET+ programmable logic are all integrated with the ZU7EV device.
A quad-core Arm® Cortex®-A53 applications processor, a dual-core Cortex-R5 real-time processor, a MaliTM-400 MP2 graphics processing unit, an H.264/H.265 video codec capable of 4KP60, and 16nm FinFET+ programmable logic are all integrated with the ZU7EV device.
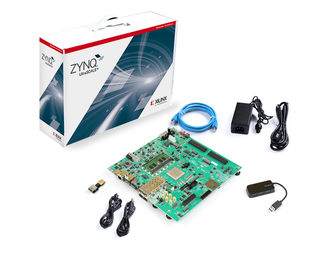
Figure1-ZCU106 Evaluation Kit
ZCU106 Evaluation Kit Features
- Optimized for quick application prototyping with Zynq UltraScale+ MPSoC
- Integrated video codec unit supports H.264/H.265
- HDMI video input and output
- PCIe® Endpoint Gen3x4, USB3, DisplayPort, and SATA
- DDR4 SODIMM – 72-bit with ECC attached to the processor subsystem
- DDR4 Component – 64-bit attached to programmable logic
- 2x SFP+ cages
- 2x FPGA mezzanine card (FMC) interfaces for I/O expansion
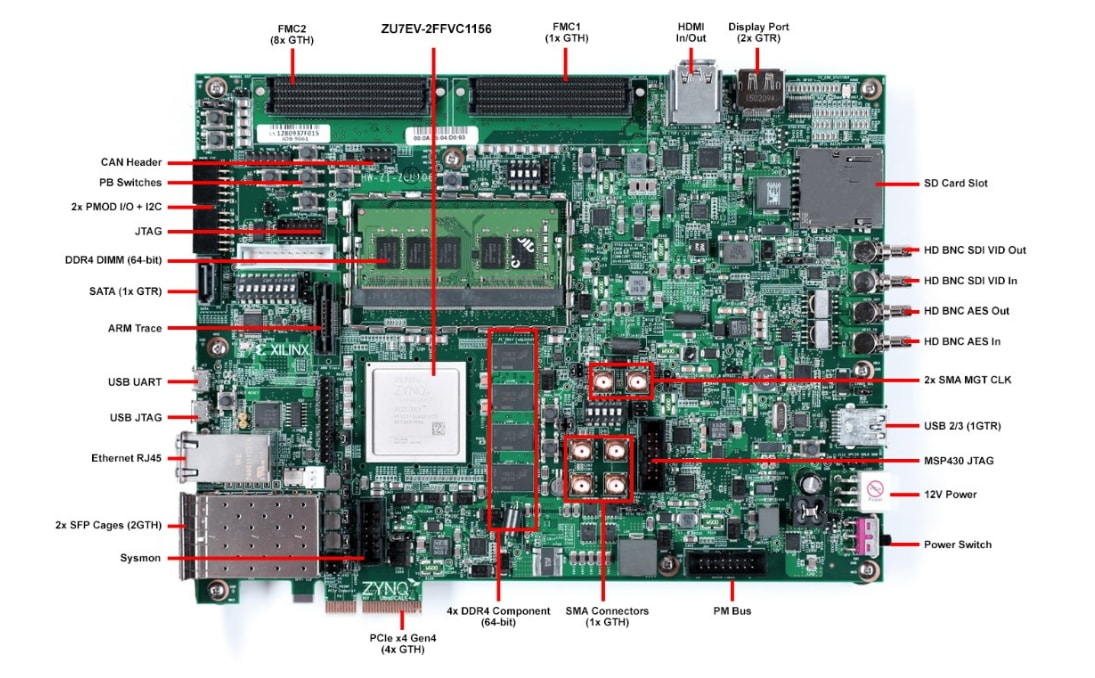
Figure2-BOARD LAYOUT
Configuration
Onboard JTAG circuitry to enable configuration over USB
Dual quad-SPI flash memory
Boot from SD card
Memory
PS DDR4 72-bit SODIMM
PL DDR4 component
Quad-SPI flash
SD card slot
Control & I/O
6x directional pushbuttons
DIP switches
PMBUS & System Controller MSP430 for power, clocks, and I2C bus switching
USB2/3
Expansion Connectors
2x FMC-HPC connectors
2 Pmod headers
Communication & Networking
SDI (x1 GTH)
AES3 audio connector
SFP+ cage (2x 2GTH)
SMA (x1 GTH)
UART to USB bridge
RJ-45 Ethernet connector
SATA (1x GTR)
PCIe Gen3 Endpoint (x4 GTH)
Display
HDMI video input and output (x3 GTH)
DisplayPort (2x GTR)
Clocking
Programmable clocks
System clocks, user clocks, jitter attenuated clocks
Power
12V wall adaptor or ATX
ZCU106 Evaluation Kit Components:
ZCU106 Evaluation Board: The main board contains the Zynq UltraScale+ MPSoC, DDR4 memory, interfaces (such as USB, Ethernet, HDMI), and expansion connectors.
Power Supply: A power adapter or USB cable is typically used to power the board.
Cables: Various cables are included for connecting peripherals and debugging, such as USB cables, HDMI cables, and Ethernet cables.
Documentation: The kit includes user guides, reference manuals, and tutorials to help users get started with the board and development tools.
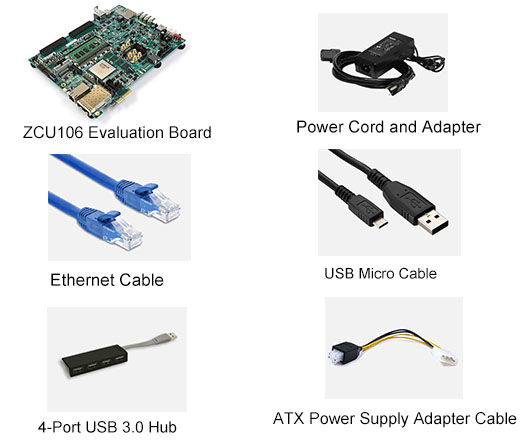
Figure3-ZCU106 Evaluation Kit Components
How to get started with the ZCU106 Evaluation Kit?
- Setting Up Hardware:
Connect the power supply to the ZCU106 board.
Connect peripherals (such as mouse, keyboard, monitor) using the available ports (USB, HDMI).
If necessary, connect the board to your development computer using Ethernet or USB.
- Setting Up Software:
Download and install the required software tools, including Xilinx Vivado Design Suite and Xilinx SDK.
Follow the user guide instructions to install additional drivers or software packages.
- Board Configuration:
Depending on your application, you may need to configure the FPGA fabric and boot parameters. This can be done using Xilinx Vivado or SDK.
- Running Examples:
Xilinx provides a variety of example projects and tutorials to help you get started with the ZCU106 board. These can be found in the documentation or online resources.
Load an example project onto the board and observe its behavior. This will help you understand the board's capabilities and how to develop your applications.
- Developing Applications:
Once you are familiar with the board and development tools, you can start developing your applications. This may involve designing hardware accelerators in the FPGA fabric, writing software for the ARM cores, or a combination of both.
Refer to the documentation and online resources for guidance on specific tasks, such as interfacing with peripherals, implementing signal processing algorithms, or optimizing performance.
- Debugging and Testing:
Use the debugging features of Vivado or SDK to diagnose and fix any issues in your design.
Test your applications thoroughly to ensure they meet the required performance and functionality criteria.
- Documentation and Support:
If you encounter any difficulties or have questions about the ZCU106 board, refer to the user guides, reference manuals, and online forums for assistance.
Xilinx provides technical support and community forums where you can ask questions and share experiences with other users.
Figure4-ZCU106 Evaluation Kit
ZCU106 Evaluation Kit Start Guide
Zynq UltraScale+ MPSoC ZCU106 Evaluation Kit Quick Start Guide

 A Comprehensive Guide to Grasping FPGA Structure6/20/2024 908
FPGA (Field-Programmable Gate Array) is an integrated circuit, a type of programmable chip, that allows engineers to program custom digital logic. It can change its hardware logic based on the program, with the primary purpose of enabling engineers to redesign and reconfigure their chips faster and cheaper, whenever they want. However, nothing in the world is ideal, and FPGA chips also have limitations!
Read More > The EU to Impose Tariffs on Electric Vehicle Imports from China in Early July6/17/2024 428
The EU to Impose Tariffs on Electric Vehicle Imports from China in Early July
Read More > What is XC7A100T-2FG484I?6/6/2024 651
XC7A100T-1CSG324C is an FPGA-based digital signal processing board, which consists of Xilinx's Virtex-7 series chips and FPGA interface chips.
Read More > Analog cycle inventory hits bottom, AI drives flash memory demand to continue6/4/2024 671
Analog cycle inventory hits bottom, AI drives flash memory demand to continue
Read More >
Hot News
- Electronic Component Symbols: Resistor, Capacitor, Transformers and Connectors
- Diode Overview: Application in Automotive Alternator Rectifiers
- Ultra-low power consumption of STM32U575/585 microcontrollers(MCU)
- Voltage-Controlled Oscillator: Principle, Type Selection, and Application
- What is Xilinx 7 Series FPGA Clock Structure- -Part two
- Zedboard zynq-7000: Zynq 7000 datasheet, Features, Architecture and Core Components
SUPPORT
ABOUT BITFOIC
QUICK LINKS
Connect with us
Tel: 86-755-23606554
E-mail: [email protected]
Address: Room A29, 24 / F, Hoi Tak Wai, Prince Edward industrial building, 706 Prince Edward Road East, San Po Kong, Kowloon,Hongkong
Mon-Fri: 09.30 AM - 18.30 PM


